
There are many signatures of the Commander format, one of the most well-known is the abundance and variety of combos. While some people aren’t wild about them, others love them! No matter what side of the combo fence you land on, there’s no denying their power and utility. They often serve as a great time limit on each game, preventing one game from turning into a whole evening of twenty-minute turns with an hour of scrolling through TikTok in between.
One of the joys of combos in Commander is their availability. There are countless options that range from hundreds of dollars to just a few cents, and can be found across all five colors, with many even being colorless. No matter your colors or budget, there will always be a combo for you!
In this article, I’ll cover five different combos that you can easily fit into your decks. I’ll explain how each combo works, and give examples of the payoffs you can use (if applicable). In case your decks need a little more power and consistency, I’ll show you some affordable tutors you can include, too. (Note: Tutors tend to dramatically increase your deck’s power level, so be sure to try and keep your deck in line with your playgroup’s relative power level.)
Each combo I discuss in this article will fit three criteria:
- They must lead directly to winning the game;
- They must be in as few colors as possible, so they can fit in as many decks as possible;
- The full combo must cost no more than $10.
So, with all that in mind, let’s start off with a combo that just recently met my requirements for inclusion!
Combo #1: Basalt Monolith + Rings of Brighthearth ($7)
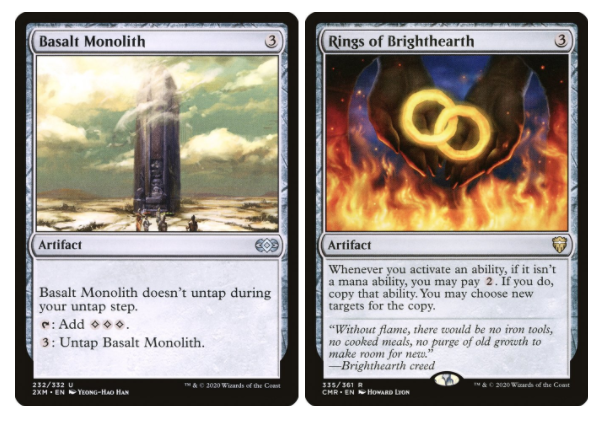
This is a classic infinite mana combo that’s been around for the majority of Commander’s lifetime. Thanks to Commander Legends including a reprint of Rings of Brighthearth at rare, it’s now much more accessible and affordable for all.
In order to pull off this combo, you’ll need access to two mana of any color in addition to these pieces. The combo works as follows: tap Basalt Monolith for three mana, activate its untap ability, then pay two extra mana to copy the untap ability with Rings of Brighthearth. This puts a second untap ability on the stack, targeting Basalt Monolith. Once the copied ability resolves, tap the Monolith for three mana again, then let the second untap ability resolve. You are now back at the start of the loop, except you now have an extra three colorless mana available. You can repeat this process until you have as much mana as your heart desires.
You can use the mana to win through a massive spell like Jaya’s Immolating Inferno or Blue Sun’s Zenith — or, if you’d like to keep it colorless, you can add Codex Shredder to the mix. The principle is the same as the initial combo: once you have infinite mana, tap your Codex Shredder to mill an opponent. Activate Basalt Monolith’s ability, then copy it using Rings of Brighthearth; the difference this time is you target the Codex Shredder with the copied ability instead, untapping it. You can repeat this process to mill your opponents out completely!
Blue has the most effective tutors for this combo: Trophy Mage can search up either piece, as can Fabricate or Whir of Invention.
Combo #2: Felidar Guardian + Restoration Angel ($1.50)
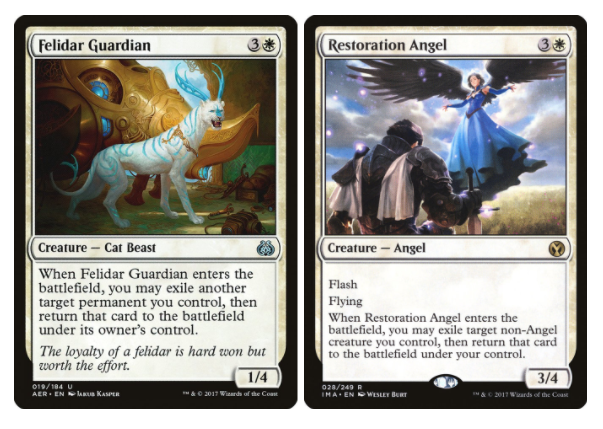
This two-card combo is as simple and elegant as they come: one creature flickers the other, resulting in infinite enter-the-battlefield triggers. This may not seem like a particularly powerful interaction at first, but its flexibility and adaptability is unmatched.
You can pair these with an Altar of the Brood to mill your opponents out, an Impact Tremors for infinite damage, or a Soul Warden for infinite life. If you want to get more convoluted, you can add a Panharmonicon to the mix: Restoration Angel can flicker another creature at the same time, and Felidar Guardian can flicker a land in addition to the Angel, resulting in infinite mana as well.
While there aren’t many affordable tutors for this combo in white alone, there are also plenty in green to choose from. Shared Summons is probably the best one, as it can get both creatures, and cards like Eldritch Evolution or Eladamri’s Call can be reasonable choices, too. The real strength of this combo, however, is that both pieces are powerful and impactful by themselves; these cards can be hugely beneficial to your game plan, especially if you have many enter-the-battlefield triggers.
Combo #3: Naru Meha, Master Wizard + Ghostly Flicker ($4.60)

Ghostly Flicker has rarely been cast just for value in Commander, and that isn’t going to change here. Naru Meha, Master Wizard pairs with it to form a potent and flexible combo that is at its best in wizard tribal decks, though it will fit neatly into any blue deck.
To start the combo, cast Ghostly Flicker and hold priority, then cast Naru Meha. She will enter the battlefield and copy Ghostly Flicker, and the copy will target her and any other permanent; this will cause her enter-the-battlefield ability to trigger again, starting the loop once more. This results in infinite flickers, and creatures leaving and entering the battlefield.
There are near endless ways to win with this combo. If you flicker a land alongside the Master Wizard, you’ll generate infinite mana; if that land is a Sunscorched Desert, you’ll deal infinite damage to your opponents, too. If you have a Sage’s Row Denizen on board, your opponents will instantly lose their entire libraries.
There are a few options of tutors for this one: Drift of Phantasms can fetch Ghostly Flicker, and Vedalken Aethermage gets Naru Meha for you. If you’re in Dimir, you can use Mystical Teachings to tutor up either piece, or make use of other transmute cards like Dimir House Guard or Perplex. You can also simply run Naru Meha as your commander; this not only gives you constant access to one half of the combo, but you can include cards like Displace or Illusionist’s Stratagem as redundant copies of Ghostly Flicker!
Combo #4: Birgi, God of Storytelling + Grinning Ignus ($2.25)
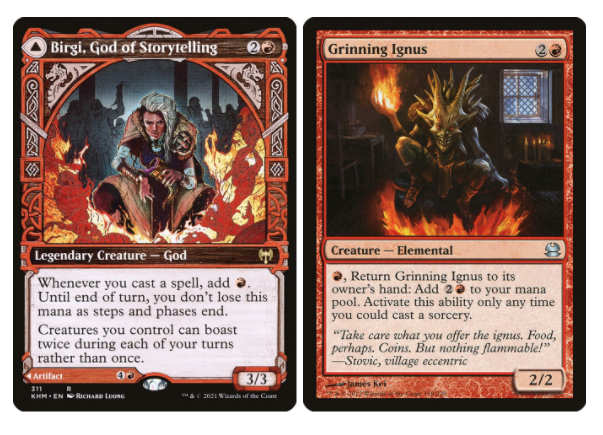
Birgi, God of Storytelling has been making some waves throughout Magic since her release in Kaldheim, and it’s easy to see why. In my article on Commander mana bases, I highlighted her as one of the most powerful standalone mana engines ever printed. It took very little time for players to discover several ways to go infinite with her, and the most common method is with Grinning Ignus.
When you cast Grinning Ignus while Birgi is out, you’ll generate one red mana. Using that mana to activate Grinning Ignus’ ability will give you back enough mana to recast Grinning Ignus and put you back at the start of the loop. You can repeat this as many times as you like, giving you an endless number of creatures entering or leaving the battlefield, and an arbitrarily large storm count.
The easiest way to win with this combo is to repeat it enough times to make a Grapeshot lethal to all of your opponents. Other storm payoffs like Brain Freeze, Temporal Fissure, or Mind’s Desire will work equally well, provided you have the mana. Bontu’s Monument can serve as a non-storm win condition, if you’d prefer, or you can stick to red with Warstorm Surge.
There aren’t many flexible tutors for this combo, but if Birgi is your Commander, then Grinning Ignus essentially becomes a one-card combo; having access to one half of your win condition in the Command Zone is a massive consistency boost, and shouldn’t be overlooked. You could add Flamekin Harbinger as a way to grab Grinning Ignus if that appeals to you, or if you’re in Izzet colors, you can have Drift of Phantasms fetch either creature.
Combo #5: Blasting Station + Myr Turbine + Dross Scorpion ($6.75)
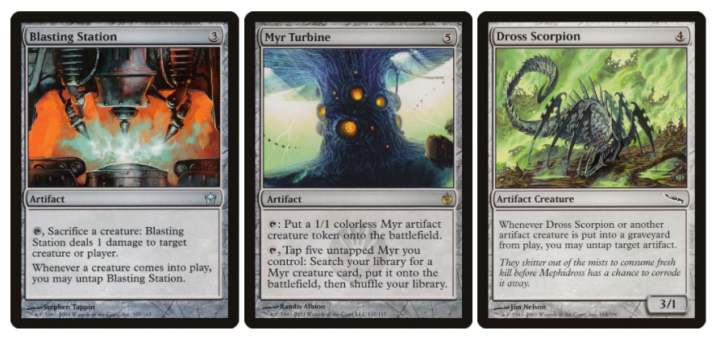
This final combo is one that sees play in a number of artifact-themed decks, but because it’s colorless, it can easily fit into any deck you like. Blasting Station has a reputation for being a combo piece, so beware — you could attract a lot of attention when you cast it!
To start, you’ll need all three pieces on the battlefield. Tap Myr Turbine to make a myr token, then sacrifice the token to Blasting Station to deal one damage to your opponent. When the token dies, Dross Scorpion can untap Myr Turbine; activate the Turbine again, and the new token will cause your Blasting Station to untap. This places you back at the start of the loop, allowing you to sacrifice the new token to start the chain once more for infinite damage. This also works if you replace Blasting Station with Grinding Station to mill your opponents out instead of dealing damage.
This combo may seem a little more fragile than the others on this list; it requires three cards, and Dross Scorpion dies to a stiff breeze, but it’s more reliable than you may think. There are countless cards that can recur creatures or artifacts in Commander, and you can initiate the loop at instant speed in response to removal, if needed.
As with the Basalt Monolith + Rings of Brighthearth combo, blue is the color best suited for your tutors. Fabricate and Reshape are some of the best options in blue, and Kuldotha Forgemaster is a great colorless option for more artifact-heavy builds. Magda, Brazen Outlaw is another fantastic, repeatable artifact tutor if you happen to be in red, too.
***
As awesome and powerful as these are, I know that combos aren’t for everyone. I’m not the biggest fan of them as a primary win condition, but when they allow me to play three exciting games instead of one long one, I become very appreciative of them. Be sure to chat with your playgroup and figure out what role combos play in your pod!
I hope these suggestions help you to get in many fun, tense, and engaging games in the future. What do you think of these combos? Do you have a favorite? Let me know over on Twitter!

Scott is an Irish content creator and the Head of Budget Magic for the Izzet League. He focuses on affordable decks in Pioneer, Modern, and Pauper, particularly ones that stray from the mainstream. When he’s not writing about his favorite decks, he can be found talking incessantly about them on Twitter and on The Budget Magic Cast.