
Mason takes a look at one of Magic’s defining characters in Yawgmoth – and where the archvillain of lore fits into the Modern format.
If you have been playing Modern for the last couple of years you might have heard of the Yawgmoth deck. Since its first big debut at SCG Knoxville in 2020 by Aaron Barich winning the whole tournament in the Oko Urza era, players have always said things like.
“I think that deck is good? IDK how it works”
“Wow, this deck is confusing”
“Hey can I scoop? You have the combo right?”
Today we are gonna tackle all those quotes and fully explain the combo, strengths of the deck, and what you are trying to accomplish with your cards. If you’re an aspiring Yawgmoth player or someone just trying to beat Yawgmoth players, you’re going to have the knowledge you need.
Why should I be playing Yawgmoth?

Yawgmoth is the premier creature combo deck in the format. It presents a fair game plan backed up with a combo finish. While decks like underworld breach do a better job at assembling a harder-to-interact-with combo, their deck has more pieces that don’t play well on their own. You are choosing to play the fair game a tad better. You’re also a deck that doesn’t fold to much hate outside of hard graveyard hate, which is lower in play right now and does need to be backed up by removal, given you are playing a deck full of creatures.
The deck has also been showing up in tournaments, putting up strong finishes with a win at one of the NRG 5k’s, a Top 4 at the SCG Indianapolis 5K, and putting two copies into the Top 8 of the Modern Challenge this week, including the ultimate winner of the event. Posting good-to-reasonable match ups versus many of the top decks, Yawgmoth is the best it has been in its time in Modern.
The Combo(s)
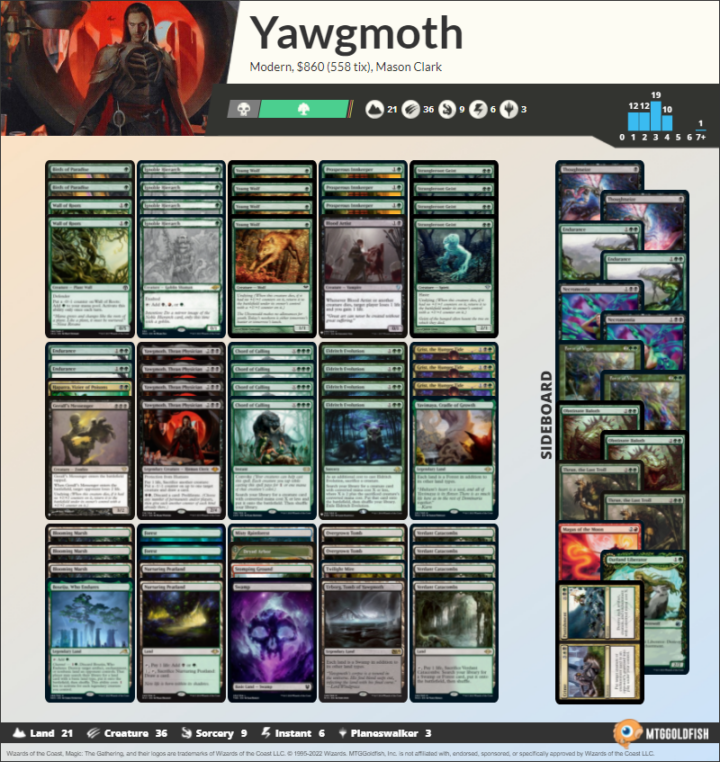
There are a few variants of the combo, but I will walk through all of them with you today, starting with the most simple and moving forward. Before we get into the combo I am going to break down the key pieces in case you haven’t seen it before.
Yawgmoth has an ability where if you sacrifice a creature and pay one life, you can place a -1/-1 counter on a creature and draw a card.
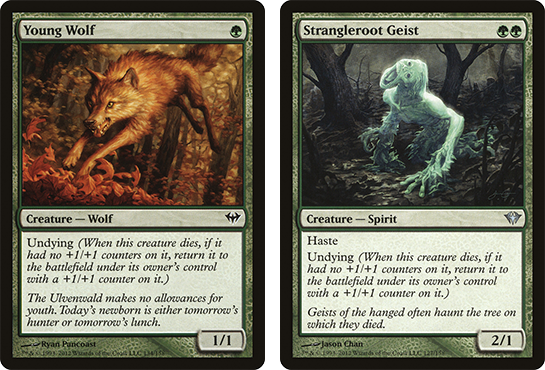
NOTE: moving forward we will use Young Wolf any time we are talking about a non-Geralf’s Messenger undying creature. Anytime Young Wolf is used in a combo, Strangleroot Geist would also be applicable.
Blood Artist Combo Kill
The easiest combo you have is Yawgmoth, two Young Wolves, and a Blood Artist.

1. You will sacrifice one of your Young Wolves and target nothing with your -1/-1 counter from Yawgmoth’s ability.
2. Your opponent will lose one life and you will gain one life from Blood Artist’s trigger. This means your opponent is now down one life and you are back where you started and your Wolf will come back in play with a +1/+1 counter on it due to undying.
3. Now you sacrifice the Young Wolf with no counters on it and target the now 2/2 Wolf with your -1/-1 counter from Yawgmoth. This will cancel out the +1/+1 counter on the old Wolf, which means you can repeat step 3.
You can repeat this as many times as you have cards in your deck.
Hapatra Combo Kill

There is another kill with the same setup, but instead of a second undying creature you have Hapatra. Hapatra will make a snake token whenever a -1/-1 counter is placed on a creature. You can then sacrifice that snake token to reset the +1/+1 counter on your Young Wolf. This does the same thing as the second Young Wolf in the combo above, allowing you the ability to kill your opponent and keep a loop going that is equal to the number of cards you have in deck.
Gerralf’s Messenger Combo Kill
For the next version of the combo, you have a Yawgmoth, a Gerralf’s Messenger, and Young Wolf. No Blood Artist needed here.
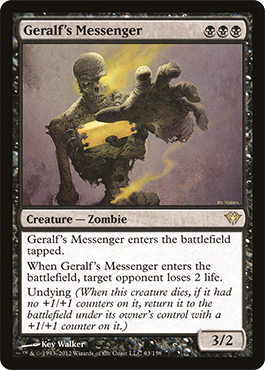
You will do the same loop we presented above, but you lose two in order to reset the counters and bring back Messenger, and they lose two from the Messenger’s enter-the-battlefield effect. If you start with more life then your opponent you will win, as they will take lethal damage before you will.
So what happens if you’re both at the same life total with this set up? Well it depends on if you’re both on an even or odd number. Let me explain:
Say we are both at 4 life. I activate Yawgmoth and lose 1 life going to 3, and I sacrifice my Messenger. Messenger returns and deals 2 damage to the opponent. I am now at 3 life they are at 2. I sacrifice another undying creature to reset the counters on the Messenger. I am at 2 life, as is the opponent. Now I sacrifice my Messenger. I am at 1, and on the Messenger’s return they go to zero. If we started both at an odd life total – for example, at three life – I’d die before the Messenger enters the battlefield and kills the opponent..
So, If you’re tied on life totals and the number is an even number, Yawgmoth wins. If you’re tied and both are odd, the opponent will win if you go for the loop.
Card Choice
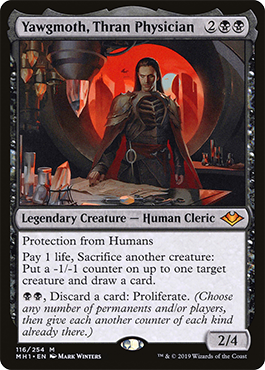
Yawgmoth, Thran Physician -This is what makes all the magic happen. We have already discussed the combo so I am going to focus on the ways you can use Yawgmoth for more “fair” purposes.
The first place to start is the proliferate ability he has. Often joked as the flavor text on the card this mode is a great way to help control a battlefield when an opponent has a large board, or survive multiple combats by chump blocking and using those blockers to shrink other non-blocked creatures and then proliferate the -1/-1 counters to save more life or even outright kill a creature. The proliferate ability is also a great way in the late game to win out of nowhere with Grist. Playing her and getting to the ultimate the turn after, or even the turn you play her, is a way to swing a race the opponent feels comfortable in.
Another use of this ability is to increase counters on your opponents cards to ruin their plans. Opponent has a Chalice on two preventing us from playing an undying creature? Proliferate it up to three. Opponent is activating an Aether Vial? Tick it up a spot to ruin their plans.
I could go on and on about how increasing your opponents counters will mess them up, so stay vigilant on how you can leverage this piece of the buffalo.
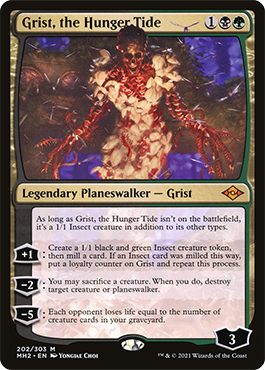
Grist the Hunger Tide – Grist is one of the strongest cards from Modern Horizons 2 that hasn’t fully broken out yet. In part because she asks for a lot of weird deck building restrictions. As such, it’s harder for her to slot right in, and until recently Lurrus made her a non-starter for many decks.
However in Yawgmoth Combo she is the card, more so than any other in the last year, that has helped propel this deck up the playabiltiy charts. Grist is a turntable answer to many problematic cards and a win condition. Her +1 of making an insect is also very good with Yawgmoth and a way to clog the battlefield, and then quickly convert a resolved Yawgmoth into the pieces you need for a combo kill.
A few things that are not obvious at first glance with Grist.
- You can Chord of Calling or Eldritch Evolution for her.
- If she dies when she ultimates, she counts towards the damage from her ultimate.
- Her -2 puts two triggers on the stack, so your opponent can respond before you sacrifice. Make sure you won’t get blown out if you can afford to be cautious. Otherwise, they might kill your only sacrifice target.
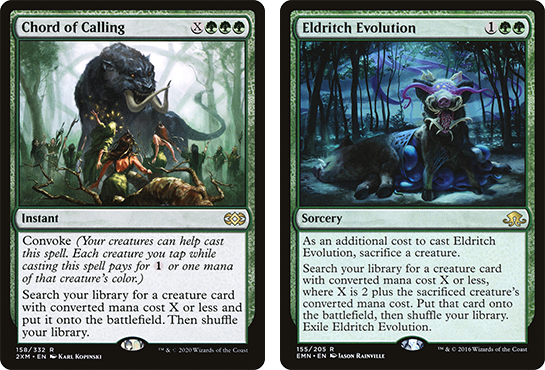
Chord of Calling and Eldritch Evolution – These cards fill similar roles in this deck. They are redundant copies of all of our creatures so that we can easily assemble the Yawgmoth combo or find Grist to answer the problematic cards in the way.
The other big thing these cards do is allow us to play cards like Magus of the Moon in our sideboard and easily find it despite often playing only one copy. Having these sideboard bullets that can lights-out some match ups is very powerful in a deck like Yawgmoth that often does not need much time to actually win the game.
Worth noting that against heavy counter magic decks, we sideboard out a few Eldritch Evolutions as the sacrifice is part of the cost of casting the card, opening us up to lots of two-for-ones.
Wall of Roots – This card serves a few small roles. For starters, it’s great at quickly dumping your hand onto the board. It also is often big enough to block the ground early so your life total isn’t heavily pressured. Unlike most decks, Yawgmoth needs their life total to be protected, since you will often activate Yawgmoth for some more cards before going for the full combo. One fun trick with Wall of Roots – it counts as two mana for Chord of Calling, as you will both convoke it and add a green to your mana pool, letting you more quickly search up the bigger Chord targets in the deck.
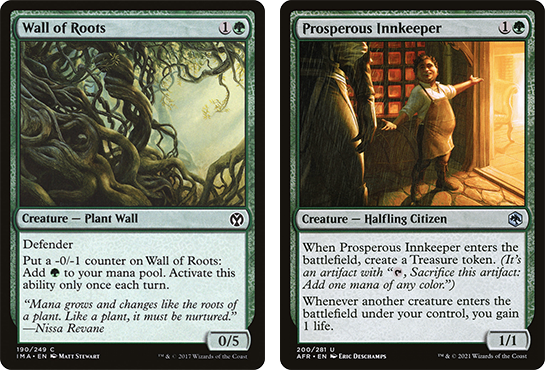
Prosperous Innkeeper – This is a card that I have quickly fallen in love with in this deck. It provides a way to allow you to easily combo kill the opponent and find the Blood Artist since your life total is no longer a choke point. It also does a great job of guaranteeing an early Yawgmoth. Innkeeper and Wall of Roots hold similar places in the deck. While Wall of Roots creates multiple mana over multiple turns, it does need to stay on the battlefield to do so. While Innkeeper only gives you extra mana one time, it always gives you the one mana. Combine that with the fact that it works towards the combo, and you can see why there is much debate on how many of each to play and what the correct split is.
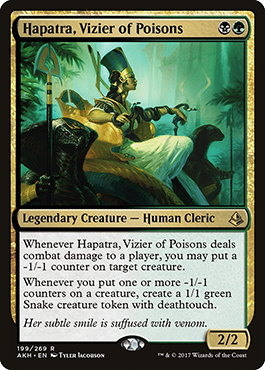
Hapatra, Vizier Of Poisons – We discussed already how she doubles as an undying creature with the combo thanks to her snakes. She does provide two other huge advantages. If you have Innkeeper in play with her and Yawgmoth, as long as you have another creature to start the sacrifice chain, you will kill your opponent’s entire board and you will stay even on life thanks to Innkeeper. If you’re lacking Innkeeper, you can still trade a certain amount to shrink or kill off the opponent’s board, while filling your hand up. Worth remembering that Yawgmoth’s proliferate can do wonders with this setup – if you’re missing the Innkeeper you can put a few counters on creatures and then start trading your extra cards in hand to manage the board.
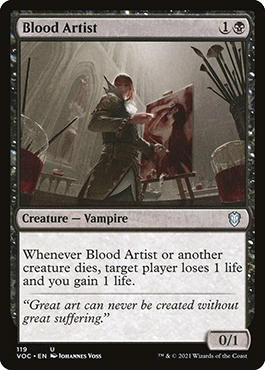
Blood Artist – There is a split in the community over this card and Zulaport Cutthroat, for two reasons:
One, Blood Artist triggers off both players’ creatures, but has to target the opponent, while Zulaport only triggers off your own creatures but doesn’t target. The reason this matters is some players are trying to dodge cards like Leyline of Sanctity from turning off the combo. I prefer Blood Artist as the default pick for a few reasons. I think Leyline is mostly a mulligan against this deck, even if they find it in their opening hand. You can often control a board or be the aggressor with other factors that render this card irrelevant. Furthermore, you almost always bring in Force of Vigor or Outland Liberator, so even if they do find the card, it’s not something we can’t overcome.
Second, Blood Artist fits our main game plan much more. We are a deck that tries to get battlefield control and pressure the opponent. This actually leads to trading off creatures in various spots. As such, the Blood Artist triggering off the opponent’s creatures is actually a huge boost to this card. As mentioned earlier, life is more of a tight resource in this deck then most, due to Yawgmoth’s main ability requiring one life to activate it.
Dryad Arbor – This land is one of the more powerful and tricky parts of the deck. Arbor gives us a body that we can search up off fetch lands, which in this deck is sometimes just the thing you need to start a sacrifice chain. It also allows our Chord of Callings to be cast for zero, allowing for a nice burst of mana.
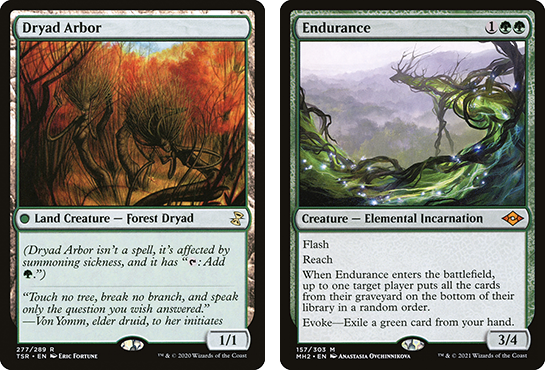
Endurance – The addition of this card to the main deck was a huge boost. At first glance it looks just like another Chord or Evolution target, but as you dig deeper into the deck you learn it serves multiple roles. Your combo isn’t actually infinite; It’s equal to the cards you have in your deck. As such we can in theory deck ourselves out. So having Endurance makes it so we won’t lose to decking.
Magus of the Moon – This card is a flex slot in the sideboard for taking down the big mana decks like Tron and Amulet Titan. Thanks to playing Chord and Evolution, you’re actually able to consistently find the one-of Magus and slow down these typically tougher match ups. A small thing to note is some players don’t even play the one Stomping Ground for the Magus, leaning on the tutor effects and the Ignobles, Birds, and treasures to cast the Magus. While I think that plan is reasonable, I have preferred to have the singular Stomping Ground. Just something to keep in mind once you get used to Yawgmoth and start making your own sideboard choices.

Necromentia – This is a card that is the most over-sideboarded-in card in this deck. I see so many players bring this card in when it’s not the right tool for the matchup. It should come in if your opponent has only one angle of attack, and by taking it out you win. A great example of this is Living End, where if you can remove the key card the deck won’t function. A bad example of Necromentia that I have seen too much is against decks like Murktide trying to name things like Unholy Heat. Their deck will still function super well, and you have wasted a large chunk of mana and a card.
Quick Hit Matchup Breakdown
Four Color (Money Pile) – A close match up, as they have things like Solitude and March of Otherworldly Light that line up well against what you’re trying to do. But you do present enough angles of attack that you’re not cold to the match up. Things like Grist go a long way in making the match up tenable. You also can reach board states where your opponent is under good pressure from your combo, and you get to clock them and strangle their mana as they try to prevent you from comboing them.
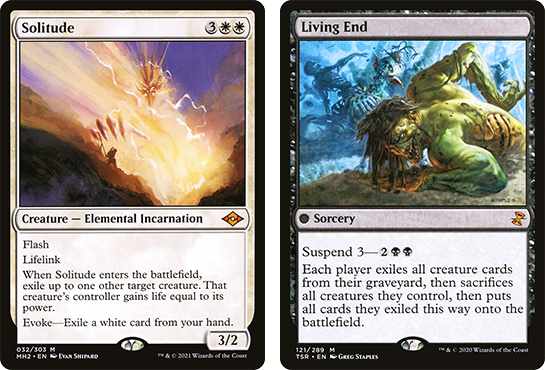
Blue Living End – A good but not great matchup. You have main deck Endurance that you can tutor for, which goes a long way in making this match up good, but ultimately your whole deck puts weird pressure on them. They do have an instant speed board clear they get to hold over you, but along those same lines if you’re able to get a Yawgmoth out, you can sacrifice your board in response so that you counteract the Living End. Sometimes you can even discard a Yawgmoth thanks to the proliferate ability so that you’re able to keep the threat of the combo up at all times. This is also a matchup where Grist shines, as she is not only a card that is helping fill up your graveyard but a card that can come back when your opponent casts Living End.
Amulet Titan – A close match up. Both decks present a fast kill that is hard for the other to interact with, and both decks are very redundant and able to assemble the combo kills consistently on turn four. However, I think if you have the Magus of the Moon sideboard tech like I suggested before, the match up becomes ever so slightly favored to Yawgmoth.

Rhinos – A good but not great match up. The removal from the Rhino deck doesn’t line up super well with our cheap resilient threats. Meanwhile our Grists line up very well at answering the Rhinos from them, especially given how Grist can not be Force of Negation-ed. They can in theory quickly get a lot of Rhinos and have a bunch of Furys to keep you from getting on board, but more often than not they’ll fall behind.
Burn – A tough match up. Your life total is actually a bit of a crucial resource early in the combo for this deck. As such, Burn provides a tricky situation as they can not only avoid our ability to clog up a board, but also pressure our life total as we are forced to start drawing for the combo. Most Burn decks also have cards like Skullcrack which makes comboing a non-starter on your turn, and can sometimes open up a spot for them to present lethal with a burn spell when you go for the combo.
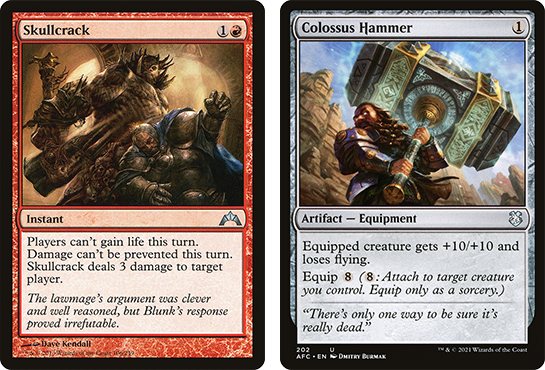
Hammer– A great match up. Before we even get into sideboard cards, we are a deck that quickly gets on board with resilient threats. Yawgmoth’s -1/-1 counter mode actually kills most creatures in the deck with just one activation, meaning they have to either try and have their actual best draws, including a shadow spear. Post-board you have Force of Vigor to really seal the deal. The opponent also has Sanctifier en-Vec, but thanks to Young Wolf and Strangleroot Geist that card only really dodges Yawgmoth, and is ultimately not that good versus our deck.
Tips and tricks
- If you’re about to deck or playing against Mill, you can evoke Endurance and stack the triggers so that you shuffle your graveyard into your deck after the sacrifice trigger. This will have the Endurance go back into your deck when the effect resolves. Against Mill, you can do it again and in the case of combing, you will not deck. Note, this also works if you can afford to draw a card off Yawgmoth first and sacrifice the Endurance after hard casting it.
- Very often your combo ends with an untapped Yawgmoth, two undying creatures, and an Innkeeper. You can now draw your whole deck, but you might not be able to get Blood Artist cast due to lack of mana, often coming up on actual turn four. To get around this, draw your whole deck then move to discard. Discard the Blood Artist, then evoke the Endurance on your opponent’s upkeep, targeting yourself. After the effect resolves but before it sacrifices to the evoke cost, tap your creatures to Chord of Calling for two and then combo again to defeat your opponent.
- Just because you have the combo, doesn’t mean you have to go for it. If your opponent can in theory break up the combo if they have removal, just continue to play a normal game and tax their mana. They will need two pieces of interaction to actually break up the combo if they move first. So if they go for it without the second piece, they are forced to have mana tied up in preventing you from comboing. This gives you a huge advantage over them and allows you to work towards playing another combo piece, to then be able to go for it or tighten the noose even more.
- Remember that you can discard creatures with Yawgmoth to proliferate your Grist, so you can ultimate early and do extra damage, thanks to the discarded creatures
- Only bring Magus of the Moon in versus Tron, Amulet and Scapeshift. Other decks that you might want to bring Magus in against are going to be able to easily answer your creatures. A great example is Four-Color Money Pile, which not only has plenty of answers, but also sometimes main decks their own Magus of the Moons.
- Almost every deck has some piece of graveyard hate that they will bring in against you. As such, it’s almost always safe to bring in Outland Liberator as a way out of the hate. Learn the typical hate that players bring to know when having more Force of Vigors in addition to (or instead of) the Outland Liberator is right.
Yawgmoth is a deck that rewards you for learning all of its little corner cases, while still providing a powerful proactive gameplan that is easy to learn but hard to master. If after reading this article you’re interested in playing Yawgmoth but still a little scared by its intricacies, I would highly suggest just picking it up and starting to play. You will fumble some at first but ultimately you will be rewarded for your hard work.
If you’re looking for more Yawgmoth content check out my twitter @masoneclark and my Twitch at twitch.tv/themasonclark.

Mason Clark is a grinder in every corner of the game who has played at the pro level and on the SCG Tour with Team Nova. Whether he’s competing in Standard, Historic or Modern, Mason plays with one goal in mind: to be a better player than he was the day before. Check out his podcast, Constructed Criticism, and catch his streams on Twitch.