
The latest Magic release is another Universes Beyond tie-in, with the totally-tubular Teenage Mutant Ninja Turtles cards now available at your LGS and on MTGArena.

I personally don’t know much about the TMNT franchise, so unlike some other Universes Beyond sets I can’t say how good a job this one does adapting signature characters and storylines. I’m only focused on the gameplay – and so far it has felt surprisingly dynamic and fun for a “small set” Limited format. It seems that some key lessons have been learned from last year’s Spider-Man experiment!
The overall experience still feels quite different to the gameplay of “normal sized” sets, but TMNT has enough replay-ability and personality to keep me interested through long stints of back-to-back drafting. Read on, and we’ll explore what you can expect and how to best position yourself for winning records in Teenage Mutant Ninja Turtles Draft.
SHAPE OF THE FORMAT
HOT TAKE ALERT: I think this format actually feels closer to playing Commander in Limited than most Commander Legends sets, and it rewards a Commander-like mindset. What do I mean by that?

Firstly, it’s a bomb-centric set. Almost every rare is great in Limited, and a lot of the uncommons have game-changing impact too. Around that we have a lot of lifegain from food cards (thanks to the pizza subtheme) and limited evasion (to balance the sneak mechanic on the new ninja cards). The removal is also quite mana inefficient, or otherwise inflexible.

In these conditions, consistently rushing down opponents with an aggro deck before they stabilize is very difficult, and so is trying to out-grind them by trading removal for threats – they just have too many. That means the clearest path to success is to simply play midrange yourself, and try to out-greed (or at least out-synergy) everyone else. Potential to scale and perform on wide board states is king in card evaluation for TMNT Draft.
In many ways this set plays quite like its immediate predecessor, Lorwyn Eclipsed, so you can go read my guide on that format if you’re hungry for extra hints. Just imagine that most decks are more like Eclipsed’s grindy, engine-based WB Treefolk archetype than the curve-out bulldozer of UW Merfolk or GB Elves.
Your value engines in this case will inevitably revolve around one or more of TMNT’s signature mechanical themes: +1/+1 counters, ETB triggers, artifacts, and sneak. These are such foundational, universal components of Magic gameplay that they barely feel like things you have to focus on doing, and they can easily be mixed and matched even outside of their “native colors”.
COLOR THEORY
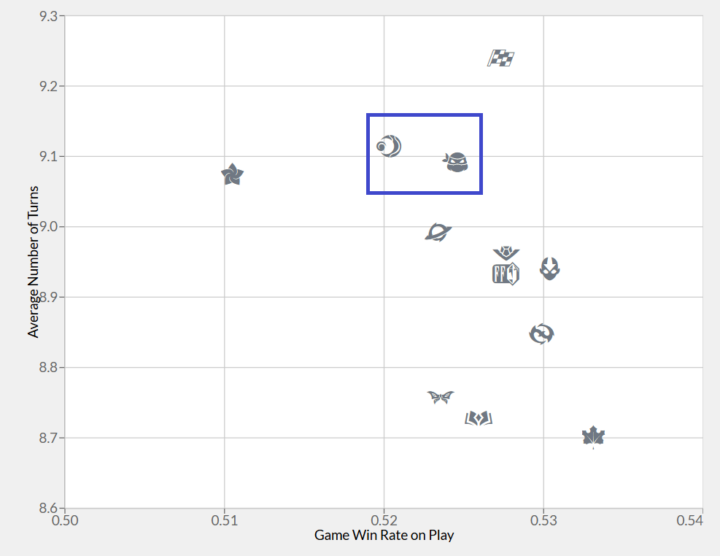
TMNT has a smaller card pool than other sets: 190 draftable cards vs. 273 for ECL; Spider-Man had 193. That’s only enough room to fit five two-color archetypes instead of the usual ten: blue-red, green-black, blue-green, white-black, and white-red. We’ll explore each of those strategies in more detail later, but for now it’s important to keep those options in mind as a starting point for figuring out your draft lane.
That’s not to say that you can’t play with or win with the other color pairs! But the supported pairs have five or six gold cards each, while the unsupported pairs get a single hybrid-mana rare. You might as well begin each draft assuming you’ll be based in one of those supported pairs and simply enjoy the surprise if the available picks land you in UB Artifacts instead of UR.

Choosing the best card available for each pick and keeping an open mind about your colors is also a good idea given the slower, bomb-centric gameplay of TMNT. Midrange decks thrive on playing the absolute best cards available, and the generic mechanical themes mean a lot of them synergize with each other even if it’s unintentional.
The only real limit on how many colors you play is how much fixing you can draft – I would describe this set as “adequate” in terms of color fixing availability, but not the best. Again, I think the best way to avoid disaster is simply take the best card available for most or all of pack 1. After that, you can consider your options.
If you were able to draft cards which all (or mostly) come from the same pair, I’d take the signal and keep drafting in that lane. Only five archetypes means you’re extremely likely to have good options for your deck in each pack, and if you get enough of the right ones you might not need to include extra colors to make up the power!

But the more picks you spend on off-color bombs because there’s nothing exciting within your chosen color pair, the more likely it is you should just lean into it and start to priority-pick fixing so you can play a rainbow greed pile. Your options are the usually cycles of two-color tap lands and land cycling creatures, an Evolving Wilds-type land, one (expensive) ramp spell, and a one-use color-filtering foodstuff in Omni-Cheese Pizza.

Under normal circumstances I’d say even the greed piles only need to play three or four colors, but Everything Pizza is the actual WUBRG signal to pay attention to. It’s a potent game winner (especially in multiples), but only if you can at least threaten to produce the mana to activate its ability. Typically, that means gunning for mana fixers even harder and trying to plan out a “three plus two splashes” kinda deck.

ARCHETYPE BREAKDOWN
I’m only going to have explanations here for the five officially supported color pairs, because even though the color options for TMNT are very open, the explanations for the cards in those colors will hold true regardless of which deck you play them in.
WB: SNEAKY NINJAS

White is definitely the most aggressive color in this set, and its gameplan is more or less defined by the new sneak mechanic. Sneak is a slight rework of the ninjutsu ability used on earlier ninja creatures; the idea is to get past opposing blockers with a cheap, evasive attacker, then swap it with a deadly ninja from your hand by paying the sneak cost! Since your opponent already declared blocks, this guarantees your sneaking ninja will deal them combat damage and trigger any nasty abilities.
TMNT also innovates by putting Sneak on some non-creature spells, essentially letting you trade some damage on your opponent for a discount on mana cost. Bouncing your own attackers is a little counterintuitive for aggro decks, but you are also often re-using valuable enters and leaves the battlefield triggers on the thing you bounce. You have to assess the benefits of using sneak compared to just casting your spell normally – a card like The Last Ronin’s Technique is usually just as good to cast in your opponent’s end step, whereas Leonardo, Leader in Blue, and Turncoat Kunoichi get significantly upgraded effects if you sneak them in.

Besides drafting these powerful ninja, you’ll need to pick up some evasive creatures (Dream Beavers, Featherbrained Filcher, April O’Neil, Kunoichi Trainee) and plenty of removal – your entire gameplan is ruined if your opponent can declare comfortable blocks! I actually think Pain 101 is a crucial piece of this deck for that reason: it lets your little guys punch through larger blockers, and it’s yet another way to recur your valuable enters and leaves triggers.
WR: ALLIANCE GO-WIDE

Red-white in this set is rather deceptive: it looks like it should just be classic swarming aggro (and it can be), but its strongest cards tend to be expensive and slow-developing. The alliance mechanic makes even the smallest creatures more impactful by adding extra ETBs to them, and it gets better the more alliance payoffs you can get in play at the same time. The ideal sequence is to set up a few of these value-generating effects and then play some cards that add multiple bodies to the field (The Last Ronin’s Technique, Mechanized Ninja Cavalry).
To ensure maximum return on the creatures you’re investing buffs into, you usually attack only with things your opponent can’t block well. That could mean evasive creatures (The Neutrinos or Wingnut, Bat on the Belfry) or it could just be something you’ve grown big enough to trade with two or three defenders. You can also swing in on the ground to set up Mouser Attack! – a devastating combat trick against attempts to multiblock your huge creature which will leave opponents scared to block at all.
As you whittle down your opponent’s life total, keep your eyes peeled for the time when it’s finally worth sending your whole team to the red zone. You might lose a couple of bodies, but even without a pump effect you will still force some damage through. Raphael, Tough Turtle is excellent at closing out any last remaining points of life, with Spicy Oatmeal Pizza another potential burn option.

But my favorite game-ender so far is simply curving The Neutrinos into Zog, Triceraton Castaway the turn after: you can attack with the Neutrinos to not only drag the chunky trampler into your combat damage a turn early, but you’ll also get a second use of his trigger: often enough to turn off any flying or reach creatures which might otherwise stop The Neutrinos connecting with their face!
UR: ARTIFACTS MATTER

UR Artifacts is interestingly positioned in this Limited meta. It doesn’t quite meld with the UG and GB decks as easily as those two do with each other, and red is probably the least splashable color in the rainbow green deck. But even if the synergy with other colors is weak, the internal synergy of this archetype is off the charts – enough for it to out-compete some of the greedy decks at their own (late)game.
The general idea is to recur cheap artifacts for their enters- and leaves-the-battlefield triggers. Mouser Foundry and Mechanized Ninja Cavalry are among the best targets for these loops, producing a swarm of 1/1 Robot tokens to clog up the battlefield. You could get some damage in with these if your opponent has a slow start, but since your strongest cards cost five or six mana it’s usually better to play defensive until you’re at that comfortable resource level.

Once you get to lategame, the top end of UR is better than most at applying pressure in heavy boardstall situations. A combination of damage-based removal (Mouser Foundry, General Traag, Heart of Stone) and bounce effects (Bespoke Bō, Metalhead) or tap effects (Utrom Scientists, Sewer-veillance Cam) helps slow opponents down to either allow early pressure, or create a window for late-game attacks to slip through.
In longer games, cards like Donatello, Way with Machines or EPF Point Squad can grow into larger threats that bully opposing creatures: that alone can be a good reason to splash into white as a complementary color. You can also splash in black for some artifact sacrifice shenanigans, or green for some cheap artifact token generation through mutagens.
UG: GROWING MUTANTS

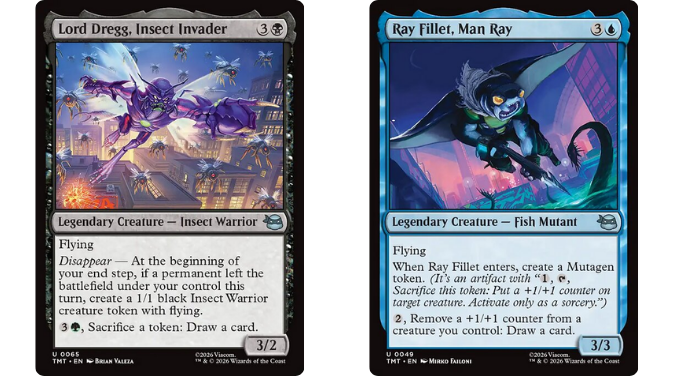
As the color combo with the least access to removal, UG relies on having bigger and scarier threats than everybody else. They already start out ahead thanks to the naturally better creature stats in green, and then push that advantage by upgrading their creatures with Mutagen tokens. If they get in danger of being outvalued in a longer game, they can use their own resource engines (Ray Fillet, Man Ray, Venus, Torn Between Worlds) to dominate that area.
Mutagen is maybe the best all-rounder mechanic in the format, synergizing with every other theme: it’s an artifact, often created when creatures enter or leave the battlefield, places +1/+ counters on things and sacrifices itself to do so (triggering disappear for the turn). As you’d expect Green also has better access to color fixing and ramp (Frog Butler, Mona Lisa, Science Geek, New Generation’s Technique) so you can add in almost any effect you open from any archetype and still have it perform well here.

Besides having enough card draw to stop opponents outlasting you, an important question for UG decks is how they’ll deal with board stalls. Swinging big expensive creatures into multiple blockers feels like a losing trade in most situations, but you need a way to push your advantage when you have it. You can make sure to play enough trample and flying creatures, but the best answer for me has been the “only one blocker” ability (Michelangel, Mutant BFF, Rocksteady, Crash Courser). Just have a Saved by the Shell or Tenderize ready to overcome pesky deathtouch blockers.
BG: DISAPPEAR VALUE

GB is a great color combination in TMNT, working fine on its own as a two-color deck or as the foundation for greedier multicolor builds. It mostly finds value by leveraging the disappear mechanic to draw cards or add free power and toughness to the board. Since that usually involves paying extra mana to sacrifice your own permanents, these interactions don’t put you as far ahead as the value engines of other archetypes – but they are more consistent to set up and use.
As with UG, GB also stands to benefit a lot from how easily the different themes of TMNT can overlap. A green card that appears to enable UG by creating Mutagen tokens turns out to also be a great disappear enabler, as it’s cheap to sacrifice the little vials whenever you need the trigger. Ice Cream Kitty, which as a hybrid mana common will be your most accessible sacrifice outlet, can turn either Mutagen tokens or the 1/1 robots spat out by red cards into excellent card draw.

Two simple but sizable advantages GB has in this set are its deathtouch and recursion. Having access to both Squirrelanoids and the excellent Frog Butler will singlehandedly cover your early game against aggro players who can’t afford to throw attackers away, and even late game will be some of the best ways to complicate attack decisions for Rocksteady and other dominant threats. Meanwhile, the combination of Paramecia Coloniex and Ragamuffin Raptor can repeatedly loop your best creatures (or in the latter case, pizzas) giving you yet another way to crush the hope of other greedy decks over the long game.
HEROES IN A HALF-SET
Despite having my reservations about small-set Limited after Marvel’s Spider-Man, I can say that the Teenage Mutant Ninja Turtles draft experience solidly impressed me. Certain rares and bombs can seriously run away with the game when not instantly removed, and it does feel like aggro decks can fall out of a game very fast unless they have a perfect curve-out draw.

But if you accept that as part of this set’s character, even the white archetypes possess plenty of tools to play longer games and push through late game damage. The ninja is not only brave and deadly; he is also patient, and cunning. Keep the wisdom of Splinter in mind as you draft, and you’re sure to taste the sweet, cheesy pizza of victory in the end!
BONUS POSTSCRIPT: BEST 1ST PACK COMMONS/UNCOMMONS BY COLOR
WHITE – Mighty Mutanimals, The Last Ronin’s Technique, Dimensional Exile, Lita, Little Orphan Amphibian, Action News Crew
BLUE – Ray Fillet, Man Ray, Donatello, Way with Machines, Stockman, Mad Fly-entist, Bespoke Bo, Metalhead
BLACK – Anchovy & Banana Pizza, Shredder’s Technique, Stomped by the Foot, Death in the Family, Lord Dregg, Insect Invader
RED – Mouser Foundry, Raphael, Tough Turtle, Old Hob, Alleycat Blues, General Traag, Heart of Stone, Wingnut, Manhole Missile
GREEN – Michelangelo, Mutant BFF, Frog Butler, Rocksteady, Crash Courser, Mona Lisa, Science Geek, Everything Pizza

Tom’s fate was sealed in 7th grade when his friend lent him a pile of commons to play Magic. He quickly picked up Boros and Orzhov decks in Ravnica block and has remained a staunch white magician ever since. A fan of all Constructed formats, he enjoys studying the history of the tournament meta. He specializes in midrange decks, especially Death & Taxes and Martyr Proc. One day, he swears he will win an MCQ with Evershrike. Ask him how at @AWanderingBard, or watch him stream Magic at twitch.tv/TheWanderingBard.